IPhone XR Screen Replacement, Step-By-Step Guide
Well, everyone knows that buying an iPhone is not a one-time investment, ensuring that this super-expensive device will last forever. You are now more open to facing challenges or issues to protect your phone. No one is really aware of when your smart device may damage in an unfortunate event. Because it’s an iPhone there is no other option than going for an expensive repair or buying a new iPhone until you are super-rich. The same is the case with Apple’s cheap flagship iPhone XR. The smartphone itself is cheap but has expensive replacement parts. Today iPhone XR parts are widely available online and the XR screen replacement is done by experts. Let’s dive into how you can replace the iPhone XR Screen yourself and what essential tools you need.

So, let’s begin our take on the iPhone XR Screen Replacement Guide.
An important thing to keep in mind is that the iPhone XR has a combined earpiece speaker+ sensor assembly fixed to the back of the display. This assembly and earpiece setup is paired individually with every iPhone XR, so it’s essential to transfer it from your old display to a new replacement display. The Face ID won’t work without it, as it contains the flood illuminator. Be careful while doing this and do not damage any of these iPhone XR parts during this procedure.
Remove The Pentalobe Screws
Before you begin opening the iPhone XR body make sure to discharge the battery below 20%. A charged iPhone XR battery can catch fire or even explode if accidentally punctured. Power off the iPhone XR. you have two 6.7 mm screws at the bottom of the iPhone XR. Remember opening the XR will lose its waterproof seals. It’s better to check the black rubber on each screw for maximum protection against dust and liquid.
Or it’s better to replace the screws during reassembly.
Tape The Display
If the display that you are going to change is cracked then it’s better to apply tape over the display to prevent any harm during the repair. You don’t need any specific tape for that, use any clear or masking tape over the iPhone XR display until the whole face is covered. This will also help in lifting the broken screen without any further breakage.
Opening The iPhone XR
Now comes the big step, you are going, to begin with, opening the tightly packed iPhone XR LCD with the body. You can either use a heat gun if available or a hair dryer to heat the adhesive underneath. Then use one of the BST Plastic opening tools, a handy tool that we recommend for anyone doing frequent repairs. Then place the suction cup over the display at the bottom and one on the back of the XR. Then pull the suction cup upwards slightly to separate the screen from the rear case. Don’t try to separate the screen in one go, you only need a small opening along the bottom to insert the opening pick.
Then twist the opener or slide the opener along the edges to the left without damaging any iPhone XR Flex cable. Don’t go way too far sliding between the gap because the top of the edge of the display is secured with glue and clips. Gently pull the display downwards in the direction of the iPhone XR charging port. Don’t pull the display with force or it may break the display clips.
Now open the display from the left side towards the power button like the back of a book cover. There are fragile cables that connect to the logic board, so be careful with that.

Display Assembly
Remove three 1.2 mm Y000 screws securing the battery connector bracket. Make sure to keep every screw safe throughout the repair as minor negligence can damage your iPhone XR. Remove the bracket and disconnect the front panel sensor from its socket on the logic board and then you can easily remove the display assembly. Then disconnect the iPhone XR battery connector and try not to damage the black silicone seal surrounding the board connections. These seals provide protection against water and dust resistance.
Keep the connector away from the logic board to prevent any accidental contact with the socket. Remove the display connector bracket by opening its 1.2 mm Y000 screws.
Now let’s set up the new iPhone XR replacement screen simply connect the display cable to the logic board and turn the iPhone XR on. Now check the screen whether it works properly or not, if any part of the screen does not function make sure to click the connectors into the sockets properly. Make sure the connectors reseat properly into place. Once it’s done the replacement screen should function properly.
Don’t be excited your work is just not finished yet. Remember the earpiece assembly and front assembly, yes it only works with the paired logic board. So, now you have to replace the previous earpiece speaker and front sensor assembly with the new display.
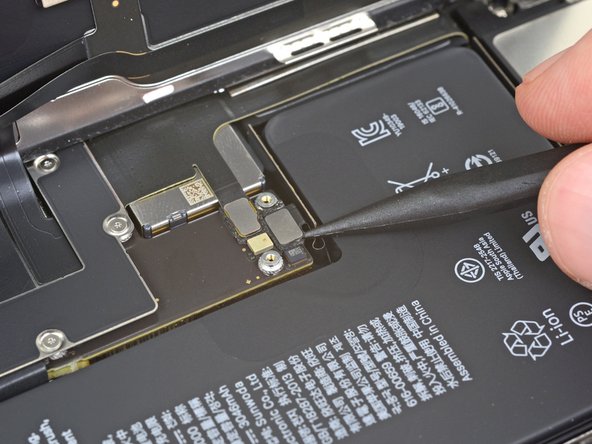
Earpiece Speaker and Front Sensor Assembly
This step is where the tough work begins, be careful while removing the four screws securing the speaker/sensor assembly to the back of the display. The speaker is attached via a very thin flex cable, so be careful not to damage the cable.
Now use the heat gun and apply it to the top front of the display, in order to soften the adhesive securing the sensors. Then gently pull out the whole sensor gently separating it from the notch. Well, it’s better to lift and hold the speaker upwards for easy access. Just be careful not to pull out any flex cable. Use tweezers to grab the ambient light sensor and lift it from its notch in the display.
Now the last thing is to keep the white display diffuser strip de attached. If not then you have to carefully take the lever out of the diffuser strip using a blade or opening tip. Place the ambient light sensor on the top of the diffuser. Hold the sensor in position while installing the screws securing the earpiece/ sensor assembly. Tighten up the screws once everything is set. Then above it places the earpiece speakers and you are all done.
Reassembly
Now you have to re-apply the display adhesive to make it water and dust resistant again. Now we cannot guarantee the IP68 rating again so we recommend not using the device near or under water.
Wrap Up
This concludes our take on the Apple iPhone XR screen replacement. Now if you are facing the same issue with your iPhone XR and want to get it replaced then you can buy all the essential tools required and the iPhone XR replacement screen from MK Mobiles.


Comments
Post a Comment